ADA compliance affects every single credit union website. Maybe you’ve already had your website double and triple checked for ADA compliance issues by an auditing company, but are you keeping an eye on the content you post regularly? Here are four things to keep in mind when you’re publishing blog posts on your website.
#1 Label and structure your content
If you love to post thoughts in a rambly, stream-of-consciousness style on your credit union website’s blog, we’ve got bad news for you. Adding clear headings and subheadings to your blog post is incredibly important for ADA compliance. Make sure that you not only include them, but that you use the correct HTML tags so that assistive technology can read the headings. You should also use plenty of white space, to make your posts painless to read.
#2 Use ALT text for all images
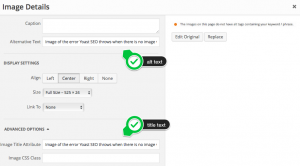
If you place an image in a blog post that is meant to communicate information (e.g., an image that contains text), then that image needs to have ALT text. ALT text is a short description of an image that screen readers can use to describe the image to vision-impaired visitors. WordPress, and some other content management systems, make it easy to add ALT text to images.
Editing ALT text in WordPress
When you write your alt text, keep it succinct and clear, e.g. “A VISA platinum rewards card”. You don’t need to include “An image of” or “A picture of” in your description; the screen reader will already identify it as an image.
#3 Make link text descriptive
The links in your blog post needs to make sense out of context. What does this mean? It means that you shouldn’t use just the URL or “click here” as your hyperlink. Instead, the hyperlink should describe where the reader will be taken to when they click on the link.
- NO: Visit https://bloomcu.com/blog/ for tips on credit union website design.
- NO: Interested in credit union website design? Click here.
- YES: Visit BloomCU for tips on credit union website design.
#4 Add captions and transcription to all videos

If you use video in your blog posts, make sure that both captions and a transcription are readily available. This may be the toughest requirement, since can take a long time to transcribe a video. Fortunately, if you upload your video to YouTube, YouTube can automatically produce a captions from human speech. The captions won’t be perfect, but they are a great first step. You can also pull up the basic transcription in Youtube (and then copy and paste it to a separate doc), which can be a big timesaver.
Want more insights?
Get our crazy ideas and doable tips in your inbox.


